반응형
Javascript Decorator Pattern 장식자 패턴 객체의 동적 기능 확장 패턴
동적으로 객체의 기능을 추가할 수 있는 장식자 패턴(Decorator Pattern) 에 대해 알아보겠습니다.
Decorator Pattern 은 객체에 어떤 기능을 동적으로 확장하는데 유용한 패턴입니다.
기능의 순서가 중요하다면 어떤 순서로 기능을 추가할지도 지정할 수 있습니다.
키보드에 기능에 따른 모델명을 출력하는 예제를 만들어보겠습니다.
우선 키보드 클래스를 생성합니다.
class Keyboard{
    constructor(){
    }
}
기본 모델명 클래스 변수와 그 변수를 리턴해주는 getModel 메소드를 생성합니다.
class Keyboard{
    constructor(){
        this.model = "PD-";
    }
    getModel(){
        return this.model;
    }
}
이제 동적으로 기능에 따른 모델명을 추가하기 위한 decorator Object를 생성합니다.
class Keyboard{
    constructor(){
        this.model = "PD-";
        this.decorator = {};
        this.decorator.hybrid = {
            getModel: function(){
                return this.uber.getModel() + "KB800";
            }
        }
        this.decorator.white = {
            getModel: function(){
                return this.uber.getModel() + "W";
            }
        }
        this.decorator.black = {
            getModel: function(){
                return this.uber.getModel() + "B";
            }
        }
        this.decorator.blank = {
            getModel: function(){
                return this.uber.getModel() + "N";
            }
        }
        this.decorator.silentness = {
            getModel: function(){
                return this.uber.getModel() + "S";
            }
        }
    }
    getModel(){
        return this.model;
    }
}
class 변수로 decorator Object를 생성하고 객체를 장식(decorate)할 5개의 decorator property를 추가합니다.
decorator에는 Keyboard가 갖는 동일한 명칭의 getModel 메소드가 있고
그 내에 this.uber는 자신에게 상속된 부모를 가리키게 됩니다.
그럼 이제 실제 장식(decorate) 기능을 하는 decorate 메소드를 Keyboard class에 추가하겠습니다.
decorate(decorator){
    const F = function(){}, overrides = this.decorators[decorator];
    let newObj = null;
    F.prototype = this;
    newObj = new F();
    newObj.uber = F.prototype;
    for(let key in overrides){
        newObj[key] = overrides[key];
    }
    return newObj;
}
여기서는 임시 생성자 패턴을 사용해 F에 this를 상속합니다.
부모에게 접근할 수 있도록 uber property도 추가합니다.
그리고 임시 생성자 F를 활용해 newObj 객체를 생성하고 여기에 overrides 객체의 property들을 추가한 후 리턴합니다. 여기에서 property는 getModel이 되겠죠.
이제 위의 decorate 메소드를 활용해 키보드 클래스에 모델명을 추가해보겠습니다.
const hhkb = new Keyboard();
hhkb = hhkb.decorate("hybrid");
hhkb = hhkb.decorate("whie");
hhkb = hhkb.decorate("blank");
hhkb = hhkb.decorate("silentness");
console.log(hhkb.getModel());
hybrid 모델에 흰색, 무각, 저소음 기능이 있는 키보드의 모델명을 출력하는 코드입니다.
결과는 'PD-KB800WNS' 가 출력됩니다.
어떻게 이런 결과가 나오는지 확인해봅시다.
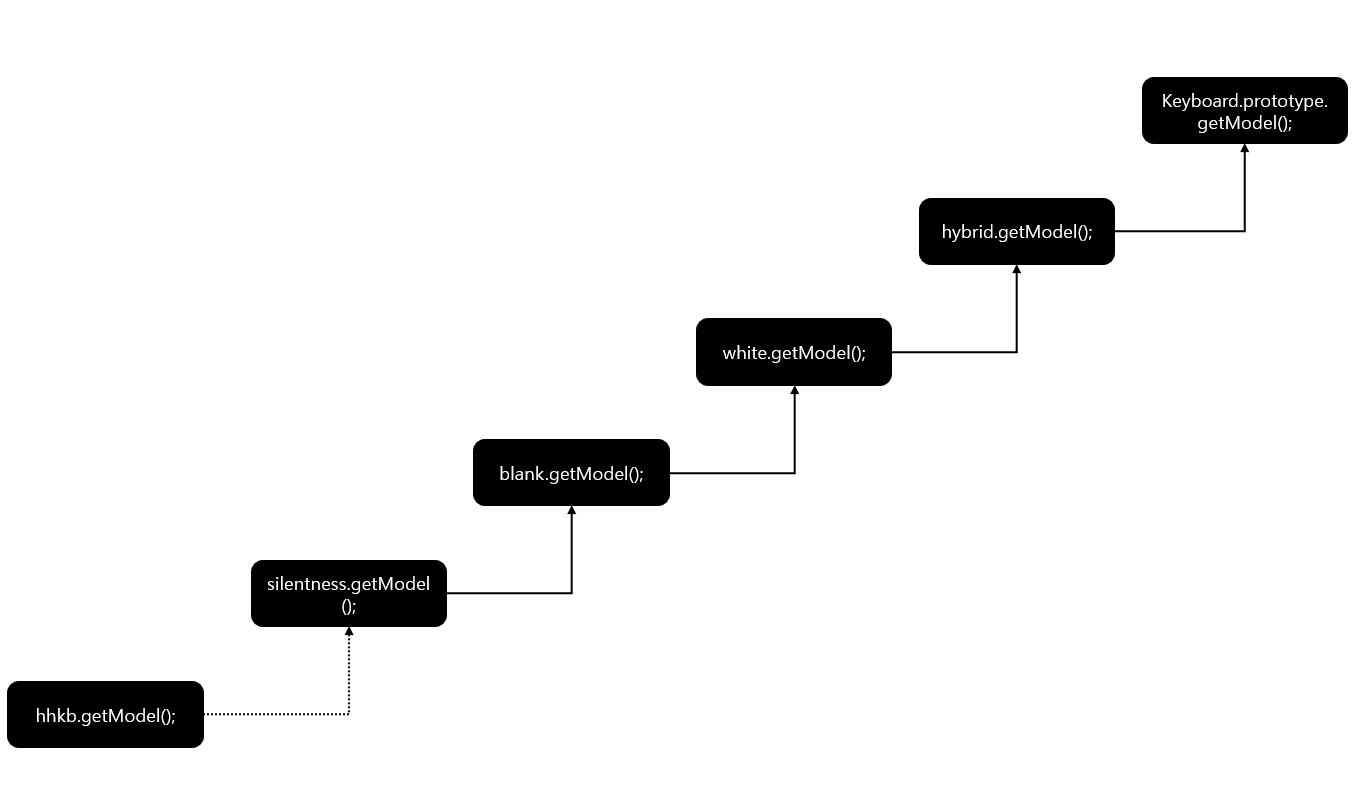
hhkb.getModel();는 마지막으로 decorate된 silentness의 getModel을 호출하게됩니다.
silentness의 getModel은 부모(this.uber)인 blank의 getModel을, blank는 또 부모인 white의 getModel을.......
이런식으로 체이닝되어 가장 상위 부모인 Keyboard.prototype의 getModel을 우선적으로 실행하게됩니다.
리턴된 'PD-'를 hybrid의 getModel에서 'KB800'을 붙여 리턴하고 white에서 'W'를 붙여 리턴...
결론적으로 'PD-KB800WNS' 가 리턴되게 되는 것이죠.
위에서 말씀드린데로 기능의 순서를 변경할 경우 모델명이 변경되게 됩니다.
hybrid -> silentness -> blank -> white = 'PD-KB800SNW'
상속을 활용하지 않고 위의 기능을 구현해보겠습니다.
class Keyborad{
    constructor(){
        this.model = "PD-";
        this.decoratorsArray = [];
        this.decorators = {};
        this.decorators.hybrid = {
            getModel: function(model){
                return model + "KB800";
            }
        }
        .
        .
        .
        .
        .
추가할 기능을 관리할 배열을 클래스변수로 추가합니다. (decoratorsArray)
그리고 각 decorator getModel에는 model 을 파라미터로 받아 기능명을 더해서 리턴 해 주도록 수정했습니다.
decorate(decorator){
    this.decoratorsArray.push(decorator);
}
decorate 메소드는 decoratorArray에 decorator를 추가하는 기능으로 수정했습니다.
getModel 메소드는 기본 모델명에 decoratorArray에 있는 decorator의 getModel을 호출하도록 변경했습니다.
getModel(){
    let model = this.model;
    for(let deco of this.decoratorsArray){
        model = this.decorators[deco].getModel(model);
    }
}
호출하는 방식도 변경됩니다.
const hhkb = new Keyboard();
hhkb.decorate("hybrid");
hhkb.decorate("whie");
hhkb.decorate("blank");
hhkb.decorate("silentness");
console.log(hhkb.getModel());
각 decorator 가 가지고 있던 기능을 getModel에서 처리하게됩니다.
반응형
'Programing > Design Patterns' 카테고리의 다른 글
| Javascript 퍼사드(façade) 패턴 / 자주 같이 사용되는 메서드를 묶자 (0) | 2022.03.31 |
|---|---|
| Javascript 전략 패턴(strategy pattern), 데이터 유효성 검증 (0) | 2022.03.30 |
| Javascript iterator, next, hasNext 메소드를 구현해보자 Iterator 패턴 (0) | 2022.03.21 |
| Javascript Factory Pattern 팩토리 패턴 반복 객체 생성 패턴 (0) | 2022.03.18 |
| Javascript 다른 객체의 메서드 호출하기 메서드 빌려쓰기 패턴 (0) | 2022.03.14 |

댓글