여러 업체들에서 간편 로그인 기능을 제공하고 있습니다. 각 업체들마다 제공하는 정보는 조금씩 다르지만, 로직은 비슷합니다. 이번 포스팅은 그 중에서 카카오 간편 로그을 구현하는 방법을 알아보겠습니다.
간단하게 전체 과정을 알아보겠습니다.
1. 과정 요약
Kakao Developers 설정
카카오 디벨로퍼스에 애플리케이션 추가 -> 플랫폼 등록 -> Redirect URI 등록 -> 동의항목 추가
동작 순서
카카오 OAuth 주소로 Client Id, Redirect URI 전송(Front)
-> 카카오는 Redirect URI 주소로 OAuth Code를 전달해줌.(Kakao)
-> 서버는 받은 OAuth Code로 Token 정보 요청
-> ToKen 정보를 받아 유저 정보 요청
2. Kakao Develoopers 설정
2.1 카카오 디벨로퍼스에 애플리케이션 추가
우선 카카오 디벨로퍼스에 가입 후에 내 애플리케이션을 클릭합니다.
Link : https://developers.kakao.com/
Kakao Developers
카카오 API를 활용하여 다양한 어플리케이션을 개발해보세요. 카카오 로그인, 메시지 보내기, 친구 API, 인공지능 API 등을 제공합니다.
developers.kakao.com

상단에 '내 애플리케이션' 을 클릭합니다.

애플리케이션 추가하기 버튼을 클릭하고

애플리케이션을 추가합니다.
추가한 애플리케이션을 클릭하면 요약정보 페이지로 이동되며 해당 애플리케이션의 키값을 확인하실 수 있습니다.

좌측 메뉴에서 '플랫폼' 을 눌러 이동합니다.
하단에 Web 플랫폼 등록을 클릭하여 플랫폼을 추가합니다.
2.2 플랫폼 등록
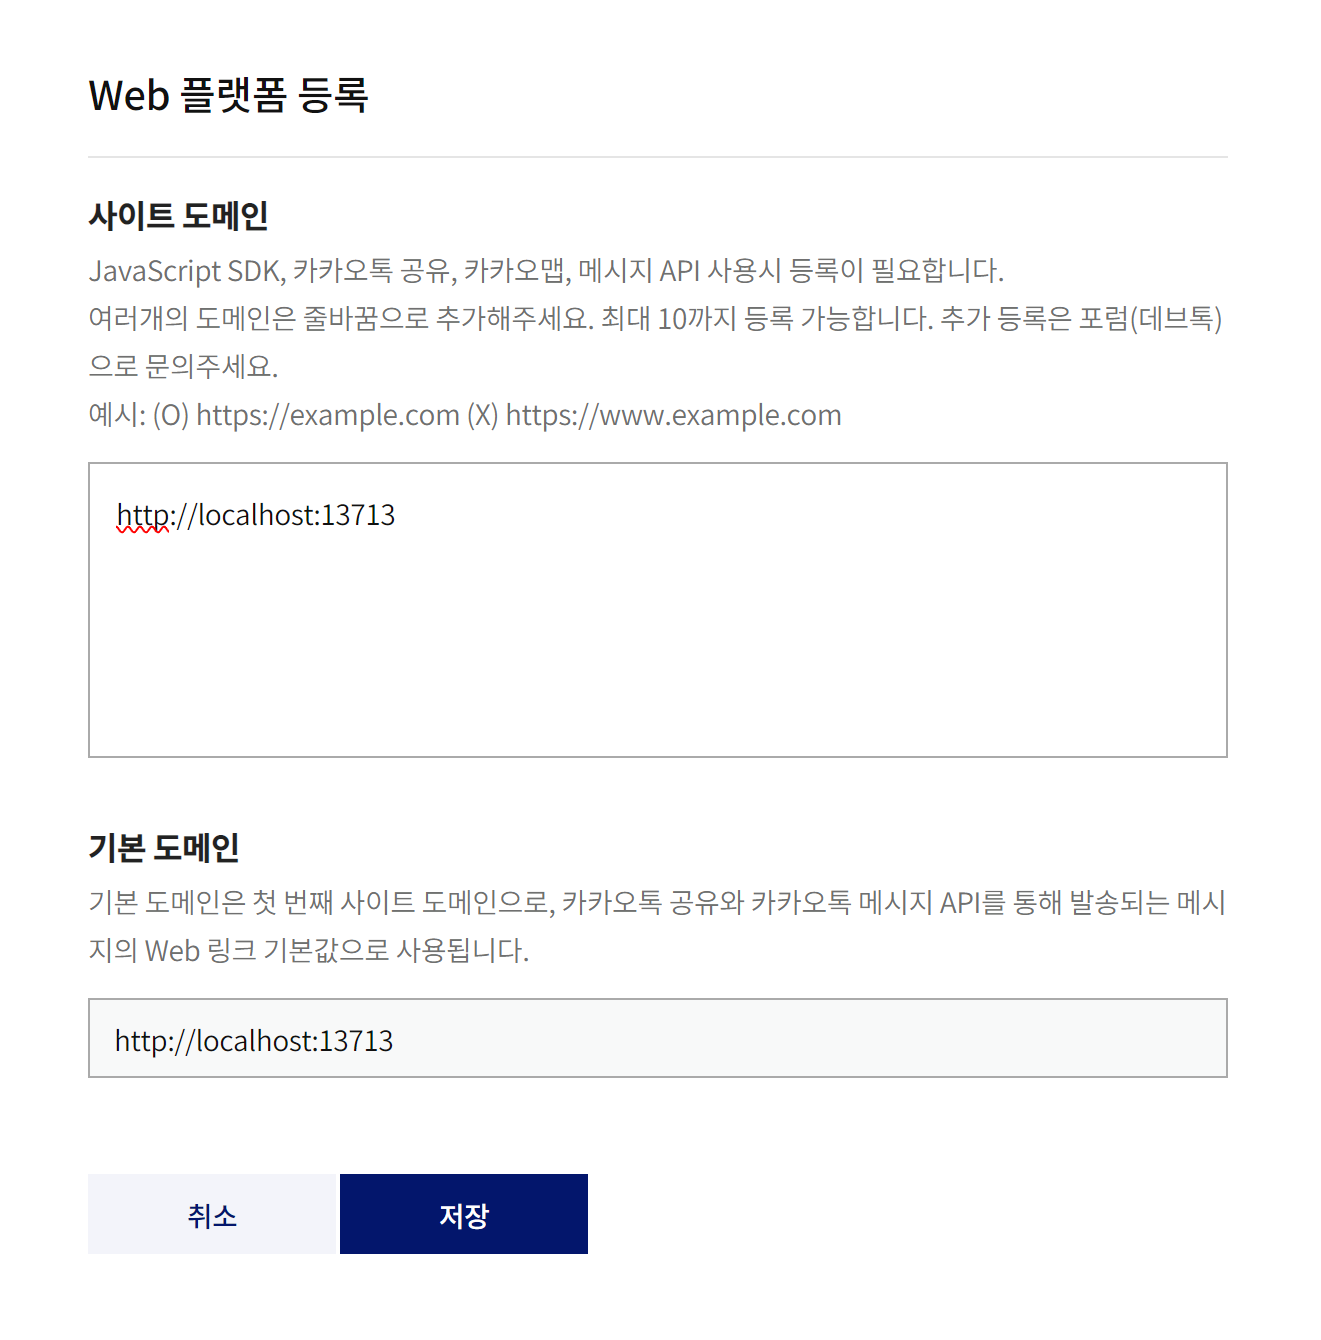
플랫폼을 추가하면 하단에 '카카오 로그인 사용 시 Redirect URI를 등록해야합니다.' 라는 문구가 있습니다.
그 옆에 있는 '등록하러 가기' 링크를 클릭하세요!
2.3 Redirect URI 등록

활성화 상태를 눌러 'ON' 으로 바꿔주시고 카카오로부터 OAuth Code를 받을 Redirect URI를 등록해줍니다.
여기서 설정하는 Redirect URI는 위에서 설명한 것과 같이 Kakao의 OAuth Code를 전달할 주소 입니다.
Front 코드를 작성하지 않을 것이기 때문에 서버에서 받을 주소를 입력했습니다. 원래는 Front에서 코드를 받을 주소를 입력하여 해당 코드를 받고 서버로 전달해주어야 합니다.

이제 카카오로 부터 OAuth Code를 받을 준비까지는 완료되었습니다.
이제 해당 코드로 Token을 받은 후 해당 Token으로 사용자의 정보를 받을 '동의항목'을 설정해야 합니다.
좌측 메뉴에서 동의항목으로 이동합니다.
2.4 동의항목 추가

테스트기 때문에 '닉네임' 만을 필수동의로 설정하겠습니다. 아래와 같이 입력하고 '저장' 버튼을 클릭합니다.

이제 기본 설정은 완료되었습니다.
컨트롤러를 구현하여 OAuth Code가 올바르게 오는지 확인해봅시다.
3. 구현 (예시코드)
@GetMapping(value = "/social/login/kakao", produces = MediaType.APPLICATION_JSON_VALUE)
@ApiOperation(value = "카카오 간편로그인 테스트", notes = "카카오 간편로그인 시 활용한다.")
@Description("Front로 부터 kakao Oauth를 받는다")
@CustomApiResponse
public void getKakaoUserInfo(String code) {
    System.out.println("OAuth Code : "+code);
}
위와 같이 컨트롤러에 메소드를 추가합니다. 여기서의 주소는 카카오에 등록한 Redirect URI의 주소와 일치해야 합니다.
그리고 테스트로 아래의 주소를 브라우저에 입력합니다.
https://kauth.kakao.com/oauth/authorize?client_id=[내 애플리케이션의 REST API 키]
&redirect_uri=[내 애플리케이션에 등록한 Redirect URI]&response_type=code
올바르게 입력을 했다면 아래와 같이 화면이 전환되는 것을 보실 수 있습니다.
앞에서 설정한 필수동의값인 닉네임이 표출됩니다. 동의 후에 '동의하고 계속하기' 버튼을 클릭합니다.

서버에 코드가 출력되는 것을 확인하실 수 있습니다.
이제 이 받은 코드로 Token을 요청하여 받고 해당 Access Token을 활용하여
필수로 설정한 닉네임 정보를 받아와야 합니다.
위의 메소드에 아래 코드를 추가해 줍니다.
@GetMapping(value = "/social/login/kakao", produces = MediaType.APPLICATION_JSON_VALUE)
@ApiOperation(value = "카카오 간편로그인 테스트", notes = "카카오 간편로그인 시 활용한다.")
@Description("Front로 부터 kakao Oauth를 받는다")
@CustomApiResponse
public void getKakaoUserInfo(String code) {
    System.out.println("OAuth Code : "+code);
    //////////////////////Token 정보 요청//////////////////////
    try {
        URL url = new URL("https://kauth.kakao.com/oauth/token");
        HttpURLConnection conn = (HttpURLConnection) url.openConnection();
        conn.setRequestMethod("POST");
        conn.setDoOutput(true);

        StringBuilder sb = new StringBuilder();
        sb.append("grant_type=authorization_code");
        sb.append("&client_id=" + "7e6fcafe9cbded6eacd03cfd7238f8ff");
        sb.append("&code=" + code);
        BufferedWriter bw = null;
        try{
            bw = new BufferedWriter(new OutputStreamWriter(conn.getOutputStream()));
            bw.write(sb.toString());
        }catch(IOException e){
            thorw e;
        }finally{
            if(bw != null) bw.flush();
        }
        BufferedReader br = null;
        String line = "", result = "";
        try {
            br = new BufferedReader(new InputStreamReader(conn.getInputStream()));
            while ((line = br.readLine()) != null) {
                result += line;
            }
        } catch (IOException e) {
            throw e;
        } finally {
            if (br != null)
                br.close();
        }
        System.out.println("result : " + result);
    } catch (IOException e) {
        e.printStackTrace();
    }
    //////////////////////Token 정보 요청 끝//////////////////////
}
이제 다시 위의 주소를 브라우저에 입력하면 result가 출력되게 됩니다.
{
	"access_token": "eR8NXxb_LhPpoWPJ6we6D1OOCXlwBlw3weKN262rCiolDgAAAYaBiHx5",
	"token_type": "bearer",
	"refresh_token": "BJTtTrsyjsS4yvzSXCJoqf3vcIdCcs6SS_Em8W2fCiolDgAAAYaBiHx4",
	"expires_in": 21599,
	"scope": "profile_nickname",
	"refresh_token_expires_in": 5183999
}
전달 받은 access_token을 활용하여 카카오 사용자 정보를 얻어 올 수 있습니다.
위에서 받은 Json String을 객체화 하기 위하여 DTO클래스를 생성하고 ObjectMapper를 이용하여 변환 후 access_token만 얻습니다.
[SOcialTokenDTO.class]
@Getter
@Setter
@ToString
public class SocialTokenDTO {
    private String access_token;
    private String token_type;
    private String refresh_token;
    private Integer expires_in;
    private String scope;
    private Integer refresh_token_expires_in;
}
ObjectMapper mapper = new ObjectMapper();
String access_token = mapper.readValue(result, SocialTokenDTO.class).getAccess_token();이제 다시 커넥션을 하는데 header에 Token을 담아 보내야 합니다.
위의 Url connection 과정을 반복합니다.
url = new URL("https://kapi.kakao.com/v2/user/me");
conn = (HttpURLConnection) url.openConnection();
conn.setRequestMethod("POST");
conn.setDoOutput(true);
conn.setRequestProperty("Authorization", "Bearer "+access_token);
System.out.println(conn.getURL());

line = ""; result = "";
try {
    br = new BufferedReader(new InputStreamReader(conn.getInputStream()));
    while ((line = br.readLine()) != null) {
        result += line;
    }
} catch (IOException e) {
    throw e;
} finally {
    if (br != null)
        br.close();
}
System.out.println("result user : " + result);
출력결과는 아래와 같습니다.
{
	"id": "식별값",
	"connected_at": "2023-02-24T03:11:16Z",
	"properties": {
		"nickname": "닉네임"
	},
	"kakao_account": {
		"profile_nickname_needs_agreement": false,
		"profile": {
			"nickname": "닉네임"
		}
	}
}
위에서 토큰정보 Json String을 객체로 변환한 것 처럼 해당 결과도 변환하여 원하는 처리를 하면 되겠죠.
자세하게 어떻게 진행되는지 전달드리기 위해 반복적인 코드도 정리하지 않고 순차적으로 코드를 작성하였습니다.
위에서 사용되는 기본 기능들을 정리하여 공유하니 두가지를 비교해 보시기 바랍니다.
4. 구현 (정리 코드)
import java.io.BufferedReader;
import java.io.BufferedWriter;
import java.io.IOException;
import java.io.InputStreamReader;
import java.io.OutputStreamWriter;
import java.net.HttpURLConnection;
import java.net.URL;
import java.util.HashMap;
import java.util.Iterator;
import java.util.Set;

import org.slf4j.Logger;
import org.slf4j.LoggerFactory;

import com.fasterxml.jackson.databind.ObjectMapper;

import lombok.Builder;
import lombok.ToString;

@Builder
@ToString
public class UrlConnection {
    private static final Logger LOGGER = LoggerFactory.getLogger(UrlConnection.class);

    private String url;
    @Builder.Default
    private String method = "POST";
    @Builder.Default
    private boolean doOutput = true;
    private HashMap<String, String> properties;
    private HttpURLConnection conn;

    /**
     * URL 커넥션관련 설정을 하고 _self 리턴 (보내는 메시지가 없는 경우)
     *
     * @author GEONLEE
     * @return UrlConnection
     * @since 2023-02-24
     */
    public UrlConnection getConnection() throws IOException{
        URL url = new URL(this.url);
        this.conn = (HttpURLConnection) url.openConnection();
        this.conn.setRequestMethod(this.method);
        this.conn.setDoOutput(this.doOutput);

        if(this.properties != null){
            Set<String> keys = this.properties.keySet();
            for(Iterator<String> itr = keys.iterator(); itr.hasNext();){
                String key = itr.next();
                this.conn.setRequestProperty(key, this.properties.get(key));
            }
        }
        return this;
    }

    /**
     * URL 커넥션관련 설정을 하고 _self 리턴 (보내는 메시지가 있는 경우)
     *
     * @author GEONLEE
     * @return UrlConnection
     * @since 2023-02-24
     */
    public UrlConnection getConnectionWithWrite(String message) throws IOException{
        BufferedWriter bw = null;
        if(this.conn == null){
            getConnection();
        }
        try{
            bw = new BufferedWriter(new OutputStreamWriter(this.conn.getOutputStream()));
            bw.write(message);
        }catch(IOException e){
            throw e;
        }finally{
            if(bw != null) bw.flush();
        }
        if(this.conn.getResponseCode() != 200) {
            LOGGER.error("소셜로그인 처리 에러\n"+this.toString());
            throw new IOException("소셜 로그인 접속에 실패하였습니다. "+this.url);
        }
        return this;
    }

    /**
     * 받은 메시지 포맷과 같은 class를 매개변수로 받아 받은 json을 class로 변환하여 리턴
     *
     * @author GEONLEE
     * @return Class
     * @since 2023-02-24
     */
    public <T> T getMessage(Class<T> clazz) throws IOException {
        BufferedReader br = null;
        ObjectMapper mapper = new ObjectMapper();
        String line = "", result = "";
        try{
            br = new BufferedReader(new InputStreamReader(this.conn.getInputStream()));
            while ((line = br.readLine()) != null) {
                result += line;
            }
        }catch(IOException e){
            throw e;
        }finally{
            if(br != null) br.close();
        }
        return mapper.readValue(result, clazz);
    }
}
활용방법
UrlConnection.builder().url(KAKAO_TOKEN_REQUEST_URL).build()
                .getConnectionWithWrite(sb.toString()).getMessage(SocialTokenDTO.class).getAccess_token();

UrlConnection.builder().url(KAKAO_USER_REQUEST_URL).properties(properties).build()
                .getConnection().getMessage(KakaoUserDTO.class);
'Programing > JAVA' 카테고리의 다른 글
| Firebase Proxy 등록 정보 및 라이브러리 수정 방법 (0) | 2023.04.11 |
|---|---|
| Swagger 잘~만들어보기 응답 Model 명확하게, 타입, 최대 최소값 표출하기 (1) | 2023.02.27 |
| Yaml 파일 객체화 yaml 파일 읽기 snakeyaml (0) | 2023.02.17 |
| Java List<?> 정렬, 다중조건정렬, 오름, 내림차순 Comparator (0) | 2023.01.25 |
| Custom Annotation 생성하기 @interface 알짜만 빼먹기 (0) | 2022.11.15 |

댓글