javascript 생성자 알짜만 빼먹기, 현업 활용 예 class, prototype
생성자 (Constructor) 는 인스턴스 (메모리상에 존재하게 하는) 객체를 생성하고 초기화 하는 함수입니다.
생성자 함수로 객체를 생성하고 활용하는 방법을 알아보도록 하겠습니다.
이전에 javascript에서는 function, new 연산자를 활용한 방식으로 객체를 생성했습니다.
(생성자 객체는 항상 대문자로 시작합니다.)
1. new연산자를 사용한 객체 생성
function Student(data){
    this.name = data.name;
    this.age = data.age;
}

const aStudent = new Student({name:"geon", age : 36});
console.log(aStudent);
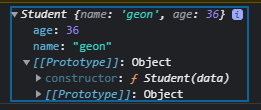
return 이 없는 function을 생성하고 new 연산자를 활용해 객체를 생성했습니다.
console 출력결과를 보시면 aStudent의 생성자(constructor)가 Student 객체인 것을 확인하실 수 있습니다.
2. class 키워드를 사용한 객체 생성
class Student {
	constructor(data){
		this.name = data.name;
		this.age = data.age;
	}
}

const aStudent = new Student({name:"geon", age:36});
console.log(aStudent);

class 키워드는 ECMAScript2015 부터 도입되었습니다.
결과는 위의 new생성자로 생성한 결과와 같죠.
이제 이렇게 생성한 객체를 현업에서는 어떻게 활용하는지 알아보겠습니다.
생성한 Student 객체에 name property를 리턴받은 getName함수를 추가해보겠습니다.
예1) 공통함수 추가
/*new 연산자 활용*/
function Student(data){
    this.name = data.name;
    this.age = data.age;
    this.getName = function(){
    	return this.name;
    }
}
const aStudent = new Student({name:"geon", age:36});
console.log(aStudent.getName());
/*class 키워드 활용*/
class Student {
constructor(data){
this.name = data.name;
this.age = data.age;
this.getName = function(){
return this.name;
}
}
}
const aStudent = new Student({name:"geon", age:36});
console.log(aStudent.getName());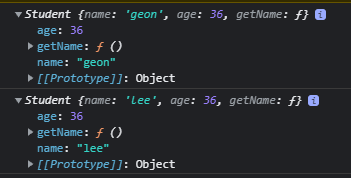
console의 결과는 geon 이 출력되겠죠. 하지만 여기에 한가지 문제가 있습니다.
객체의 name을 리턴받는 getName 함수는 객체에서 공통으로 사용되는 함수인데, 객체를 생성할 때마다 객체의 property로 가지고 있게 됩니다. 이는 메모리의 낭비를 야기하기 때문에 객체에 공통으로 사용되는 함수는 prototype으로 한번만 선언하여 사용해야 합니다.
/*new 연산자 활용*/
function Student(data){
    this.name = data.name;
    this.age = data.age;
}
Student.prototype.getName = function(){
	return this.name;
}
/*class 키워드 활용*/
class Student {
constructor(data){
this.name = data.name;
this.age = data.age;
}
getName(){
return this.name;
}
}
예2) 상속
/*new 연산자 활용*/
function Student(data){
this.name = data.name;
this.age = data.age;
}
Student.prototype.getName = function(){
return this.name;
}
function Score(data){
Student.apply(this, arguments);
this.math = data.math;
this.science = data.science;
}
Score.prototype = Object.create(Student.prototype);
Score.prototype.constructor = Score;
Score.prototype.getScore = function(){
return this.getName()+"=> math : "+this.math+", science : "+this.science;
}
const aScore = new Score({name:"geon", age:36, math:90, science:100});
console.log(aScore.getScore());
올바른 예시는 아니지만 학생의 수학, 과학 점수를 받아 출력하는 Score 객체를 생성합니다.
Student.apply(this, arguments); => 상속받은 객체로 파라메터 전달
Score.prototype = Object.create(Studnet.prototype); => prototype 설정 (Score <- Studnet)
Score.prototype.constructor = Score; -> 생성자설정
이렇게 구현하면 Score 는 Student를 상속하여 Student의 property에 접근 할수 있게됩니다.
/*class 키워드 활용*/
class Student {
	constructor(data){
		this.name = data.name;
		this.age = data.age;
	}
	getName(){
		return this.name;
	}
}
class Score extends Student{
constructor(data){
super(data);
this.math = data.math;
this.science = data.science;
}
getScore(){
return this.getName()+"=> math : "+this.math+", science : "+this.science;
}
}
const aScore = new Score({name:"geon", age:36, math:90, science:100});
console.log(aScore.getScore());
super(data); 과 Student.apply(this, arguments); 는 같은 기능
Score.prototype = Object.create(Studnet.prototype); ,Score.prototype.constructor = Score; 과
extends Student 가 같은 기능으로 동작합니다.
현업에서 자주 활용되는 객체생성, 공통함수 추가, 상속 방법을 new 연산자를 활용한 방법과 class 키워드를 사용하는 방법으로 알아보았습니다.
정확히 이해하고 직접 사용해 보도록 합시다~
'Programing > JavaScript' 카테고리의 다른 글
| javascript 비공개 프로퍼티와 메소드, class prototype private public (0) | 2021.11.10 |
|---|---|
| 프로그래밍에서의 Curring 이란? Curring in javascript (0) | 2021.10.28 |
| javascript Object 의 property가 있는지 체크하는 여러 방법 (0) | 2021.10.27 |
| 주니어 개발자가 들이면 좋은 습관! (0) | 2021.10.19 |
| javascript Template literals (Template strings) 문자열 병합 (0) | 2021.10.19 |

댓글