springboot 2.x + spring security mariadb login 구현 WebSecurityConfigurerAdapter, configAuthentication 사용
최대한 간단한 방법으로 springboot 2.x 프로젝트에
spring security 를 적용해보겠습니다.
spring boot 프로젝트 생성은 아래의 link를 참고하세요.
link : Eclipse Spring boot Gradle 프로젝트 간단 생성 방법
[Spec]
Springboot version : 2.2.2
gradle
database : mysql
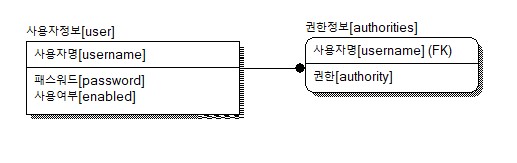
우선 로그인에 필요한 유저정보와 권한 정보 테이블이 필요합니다.
spring security 에서 필요한 기본 정보만 있는 테이블입니다.
기존 테이블을 활용하실 분들은 필드만 참고해주세요.
1. spring security 의존성 주입
[gradle]
/*web*/
compile group: 'org.springframework.boot', name: 'spring-boot-starter-web', version: '2.2.0.RELEASE'

/*Spring Security*/
compile group: 'org.springframework.boot', name: 'spring-boot-starter-security', version: '2.2.1.RELEASE'
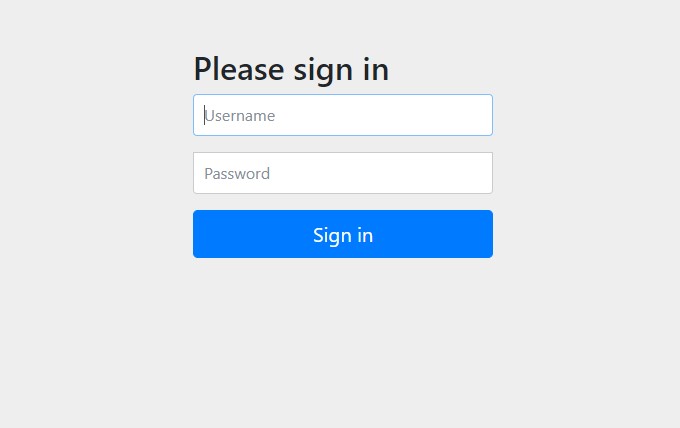
이 두가지 의존성 주입만으로 http://localhost:8080/ 을 입력하면 아래와 같은 로그인 페이지를 보실 수 있습니다.
2. database connection 설정
application.properties에 DB 연결 관련 설정을 해줍니다.
spring.datasource.driverClassName=org.mariadb.jdbc.Driver
spring.datasource.url=jdbc:mariadb://아이피:포트/sid
spring.datasource.username=유저명
spring.datasource.password=비밀번호
그리고 database 연결을 위한 의존성 주입을 추가합니다. (mariadb 기반)
/*mariadb-java-client*/
compile group: 'org.mariadb.jdbc', name: 'mariadb-java-client', version: '2.5.1'
compile('org.springframework.boot:spring-boot-starter-jdbc')
이제 security 설정을 위한 WebSecurityConfig 클래스를 생성합니다.
import javax.sql.DataSource;

import org.springframework.beans.factory.annotation.Autowired;
import org.springframework.context.annotation.Configuration;
import org.springframework.security.config.annotation.authentication.builders.AuthenticationManagerBuilder;
import org.springframework.security.config.annotation.web.builders.HttpSecurity;
import org.springframework.security.config.annotation.web.configuration.EnableWebSecurity;
import org.springframework.security.config.annotation.web.configuration.WebSecurityConfigurerAdapter;
import org.springframework.security.crypto.bcrypt.BCryptPasswordEncoder;

@Configuration
@EnableWebSecurity
public class WebSecurityConfig extends WebSecurityConfigurerAdapter{

	@Autowired
	DataSource dataSource;

	@Override
    protected void configure(HttpSecurity http) throws Exception {
        http.authorizeRequests()
                .antMatchers("/resource/**", "/login", "/login-error").permitAll() /*인증이 필요없는 정적 데이터*/
                .antMatchers("/main").hasRole("USER") //.antMatchers("/main").access("hasRole('ROLE_ADMIN')") 와 같음
                .anyRequest().authenticated() /* 그 외 모든 요청은 인증된 사용자만 접근이 가능하게 처리*/

        .and().formLogin()
                .failureUrl("/login?error") /*로그인 실패시 url*/
                .defaultSuccessUrl("/main", true) /*로그인 성공시 url*/
                .permitAll()
        .and().logout()
                .logoutUrl("/logout")  /*로그아웃 url*/
                .logoutSuccessUrl("/login")  /*로그아웃 성공시 연결할 url*/
                .permitAll();
        http.csrf().disable();
    }

    @Autowired
	public void configAuthentication(AuthenticationManagerBuilder auth)
		throws Exception {

		auth.jdbcAuthentication().dataSource(dataSource)
			.usersByUsernameQuery("select username, password, enabled from users where username = ?")
			.authoritiesByUsernameQuery("select username, authority as role from authorities where username = ?")
			.passwordEncoder(new BCryptPasswordEncoder());  /* 패스워드 암호화 시 사용 */
	}
}
코드에 대한 설명은 주석을 보시면 이해가 되실거라 생각이 됩니다.
패스워드는 BCrypt 암호화 로직을 사용했고, 아래의 코드를 사용하면 암호화된 값을 보실 수 있습니다.
System.err.println(new BCryptPasswordEncoder().encode("비밀번호"));
가장 중용한 부분은 configAuthentication 메소드 입니다.
데이터베이스 연동을 통해 자동적으로 인증을 할 수 있게 지원을 해줍니다.
사용자정보를 가져오는 쿼리에서 username과 password, enabled(1:사용,0:미사용) 와
인증정보를 가져오는 username과 role은 필수값이니 쿼리내에서 꼭 가져오도록 작성해주셔야합니다.
컬럼명이 다른경우 AS를 써주셔서 맞춰주세요.
그리고 아래의 코드를 보시면, hasRole("USER") 라고 되어있지만 DB에 데이터는 ROLE_USER로 저장되어 있습니다.
이는 security 에서 "ROLE_" 을 prefix 하기 때문입니다.
/main 으로 연결된 페이지는 USER 권한이 있어야 접근이 가능하다는 설정입니다. 만일 권한이 다르다면 403 Forbidden 에러가 발생하게 됩니다.
.antMatchers("/main").hasRole("USER") //.antMatchers("/main").access("hasRole('ROLE_ADMIN')") 와 같음
이제 다시 http://localhost:8080 을 브라우저에 입력해봅니다.
로그인 성공 시 /main 페이지로 (현재 /main페이지 연결이 되어 있지 않으므로 404 에러)
로그인 실패 시 /login?error로 되는 것을 확인 하실 수 있습니다.
[로그인 성공]

[로그인 실패]

'Programing > Spring Security' 카테고리의 다른 글
| JWT Access Token, Refresh Token 사용 방식 정리, 장단점, 보안 (2) | 2023.11.22 |
|---|---|
| Spring Starter security 2.x 3.x 설정 방식 차이 (2) | 2023.11.21 |
| spring boot security login error message 한글 설정 (2) | 2019.12.06 |
| springboot 2.x spring security 중복로그인 방지, logout 시 session 삭제 안될때 처리 (0) | 2019.12.04 |

댓글